Welcome to the World of Royal Icing
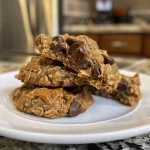
Have you ever gazed at beautifully decorated sugar cookies and wondered how to achieve that stunning look? Well, you’re in for a treat! In this guide, we’re diving into the art of making **royal icing**, the magical topping that transforms ordinary cookies into extraordinary works of art. With just a few simple ingredients, you’ll be able to create stunning decorations that taste as delightful as they appear. So, roll up your sleeves and let’s embark on this sweet journey together!
Why You’ll Love This Recipe
This royal icing recipe is not just about aesthetics; it also delivers on taste and versatility. Here are five reasons why this icing will become your go-to for all your cookie decorating needs:
- Easy to Make: With just a handful of ingredients, you can whip up a batch of royal icing in no time, even if you’re a beginner.
- Perfect for All Occasions: Whether it’s a birthday party, holiday gathering, or a casual get-together, this icing adds that special touch to your sugar cookies.
- Customizable Colors: Use gel food coloring to create vibrant hues that suit any theme or celebration.
- Varied Consistencies: You can easily adjust the icing’s thickness for outlining, flooding, or adding intricate details.
- Long-Lasting Hold: Once dried, your decorated cookies maintain their design without smudging or fading, making them perfect for gifting or displaying.
Ingredients You’ll Need
Before we dive into the steps, let’s gather our ingredients. Here’s what you’ll need for the **best royal icing for sugar cookies**:
- 4 cups (480g) **Powdered Sugar**, sifted to remove lumps
- 3 tablespoons (21g) **Meringue Powder**
- 6 tablespoons (90ml) **Warm Water**, plus more for thinning
- 1 teaspoon **Pure Vanilla Extract** or clear vanilla for the whitest icing
- 1/4 teaspoon **Cream Of Tartar** for extra stability
- **Gel Food Coloring** in desired shades
- **Flavor Extracts** such as almond, lemon, or peppermint (optional)
Tools to Use

Having the right tools can make your icing experience smoother. Here are some essentials:
- **Stand Mixer or Hand Mixer**: For achieving the right consistency.
- **Mixing Bowls**: Use multiple bowls for holding different colors and consistencies.
- **Piping Bags**: Essential for decorating your cookies with precision.
- **Piping Tips**: A variety of tips for different icing techniques.
- **Offset Spatula**: Great for spreading icing evenly on cookies.
- **Toothpicks**: Useful for mixing colors and creating designs.
How to Make the Best Royal Icing
Let’s get started on crafting your royal icing masterpiece! Follow these step-by-step instructions:
Step 1: Prepare Your Workspace
Clear your countertop and lay out all ingredients within arm’s reach. A tidy workspace allows for a smoother icing process.
Step 2: Combine the Dry Ingredients
Pour the sifted powdered sugar into your mixing bowl. Sprinkle the meringue powder and cream of tartar over the sugar. Whisk these dry ingredients together for 30 seconds until completely combined.
Step 3: Add the Liquid Ingredients
Pour the warm water and vanilla extract into the bowl with your dry mixture. Start your mixer on the lowest speed to prevent a powdered sugar explosion. Gradually increase the speed.
Step 4: Beat to Stiff Peak Consistency
Increase the mixer speed to medium-high. Beat the mixture for 7 to 10 minutes until it transforms into glossy, thick icing that holds its shape.
Step 5: Test the Consistency
Lift your spatula from the bowl and observe how the icing behaves. Stiff consistency icing holds its peak without drooping, perfect for outlining.
Step 6: Create Medium Consistency for Details
Transfer half your icing to a separate bowl. Add water one teaspoon at a time, mixing thoroughly after each addition until it reaches a medium consistency suitable for details.
Step 7: Make Flood Consistency for Filling
Take a third portion of the icing and thin it further with additional water. The icing should flow smoothly from your spatula in a continuous ribbon, perfect for flooding.
Step 8: Divide and Color Your Icing
Separate your prepared icing into small bowls based on how many colors you need. Add gel food coloring using a toothpick and mix until you achieve the desired shades.
Step 9: Fill Your Piping Tools
Transfer stiff and medium consistency icings into piping bags fitted with small round tips, ready for decorating your cookies.
Step 10: Outline Your Cookies First
Using the stiff consistency icing in your piping bag, create borders around each cookie edge. This serves as a barrier for the flood icing.
Step 11: Flood the Cookie Surface
Working within your dried borders, squeeze flood consistency icing onto the cookie surface, smoothing it out to fill any gaps.
Step 12: Add Wet-On-Wet Details
While your flood icing remains wet, pipe dots, lines, or designs using different colors. This technique allows for beautiful marbling and intricate patterns.
Step 13: Allow Proper Drying Time
Leave decorated cookies undisturbed on flat surfaces for at least 2 hours. This ensures that the icing sets properly and maintains its design.
Step 14: Layer Additional Decorations
Once your base layer has fully hardened, add dimensional details using stiff consistency icing. This could include flowers, borders, or any creative touches.
Common Mistakes and Troubleshooting
Even seasoned bakers can encounter issues. Here are some common mistakes and how to troubleshoot them:
- Too Runny Icing: If your icing is too thin, add powdered sugar a tablespoon at a time until the desired consistency is reached.
- Too Thick Icing: To thin out your icing, add warm water one teaspoon at a time until it flows smoothly.
- Air Bubbles: If you notice air bubbles in your icing, tap the bowl gently on the counter or use a toothpick to pop them before icing your cookies.
- Cracking Icing: If your icing cracks as it dries, it may have been too thick or dried too quickly due to heat. Allow it to dry at room temperature, away from direct sunlight.
Variations on Royal Icing
Feel free to get creative with these royal icing variations:
- Chocolate Royal Icing: Add unsweetened cocoa powder to your powdered sugar before mixing for a chocolatey twist.
- Lemon Royal Icing: Substitute lemon juice for part of the water to create a delightful citrus flavor.
- Spiced Royal Icing: Incorporate spices like cinnamon or nutmeg for a seasonal flair.
- Flavored Royal Icing: Experiment with different flavor extracts, such as almond or peppermint, to match your cookie theme.
Storage and Make-Ahead Instructions
Need to prepare ahead of time? Here’s how to store your royal icing:
- **Room Temperature**: Royal icing can be kept at room temperature for up to 2 days. Just cover it with a damp cloth to prevent it from drying out.
- **Refrigeration**: If you need to store it longer, place it in an airtight container in the refrigerator for up to a week. Bring it back to room temperature before using.
- **Freezing**: For long-term storage, royal icing can be frozen for up to 3 months. Thaw it overnight in the fridge and stir well before using.
Comprehensive FAQ
Here are some frequently asked questions to help you on your royal icing journey:
- Can I use powdered egg whites instead of meringue powder? Yes, you can use powdered egg whites, but the results may vary slightly.
- How long does royal icing take to dry? Depending on humidity and thickness, it can take anywhere from 2 to 24 hours to fully dry.
- Can I use royal icing on buttercream-frosted cookies? Absolutely! Just ensure the buttercream is set before adding royal icing.
- What’s the best way to color royal icing? Gel food coloring is preferred as it doesn’t alter the consistency of the icing.
- How do I achieve a shiny finish on my icing? Use a food-safe spray or brush on a thin layer of corn syrup once the icing has dried.
- What can I do if my icing is too hard? Add a few drops of water and mix well until you reach the desired consistency.
- Can I pipe royal icing onto fondant? Yes, royal icing can be piped onto fondant for added decoration.
- Is royal icing safe to eat? Yes, especially when made with pasteurized meringue powder.
Nutrition Tips and Dietary Adaptations
While royal icing is a treat, here are some tips for those watching their nutrition:
- Low-Sugar Option: Use a sugar substitute designed for baking to reduce the sugar content.
- Dairy-Free: This recipe is naturally dairy-free, making it suitable for various dietary restrictions.
- Allergen-Free**: Ensure your food coloring and flavor extracts are free from allergens.
Serving Suggestions
Now that your cookies are beautifully decorated, here are some serving ideas:
- Cookie Platters: Arrange your decorated cookies on a festive platter for a stunning centerpiece at parties.
- Gift Boxes: Package your cookies in clear cellophane bags or decorative boxes for thoughtful gifts.
- Cookie Exchange: Bring your cookies to a cookie exchange and wow everyone with your artistic designs.
- Tea Parties: Serve your cookies alongside tea for a charming afternoon gathering.
Conclusion
Congratulations on mastering the art of royal icing! With this recipe in your back pocket, you can create beautiful, delicious sugar cookies for any occasion. Remember, each time you bake and decorate, you’re not just making treats—you’re creating memories and sharing joy. So, gather your friends, swap stories, and savor each moment in the kitchen. Happy decorating!

Best Royal Icing for Sugar Cookies
Ingredients
Dry Ingredients
- 4 cups Powdered Sugar, sifted to remove lumps
- 3 tablespoons Meringue Powder
- 1 teaspoon Cream Of Tartar (for extra stability)
Liquid Ingredients
- 6 tablespoons Warm Water, plus more for thinning
- 1 teaspoon Pure Vanilla Extract or clear vanilla (for whitest icing)
Flavor & Color
- to taste Gel Food Coloring in desired shades
- optional Flavor Extracts such as almond, lemon, or peppermint
Instructions
- Combine sifted powdered sugar, meringue powder, and cream of tartar; whisk for 30 seconds.
- Add warm water and vanilla; beat on low until combined, then increase to medium-high for 7-10 minutes until glossy and thick.
- Test icing consistency; divide into portions for stiff, medium, and flood consistencies, thinning with water as needed.
- Color the icing with gel food coloring; transfer to piping bags for decorating.
- Outline cookies with stiff icing, flood with medium consistency, and add details while wet. Let dry for at least 2 hours before decorating further.