Why You’ll Love This Recipe
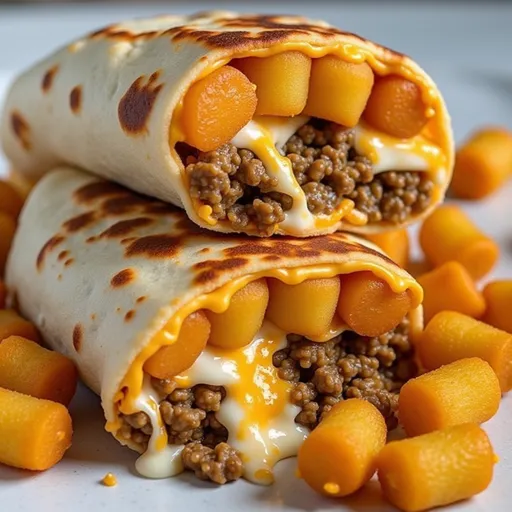
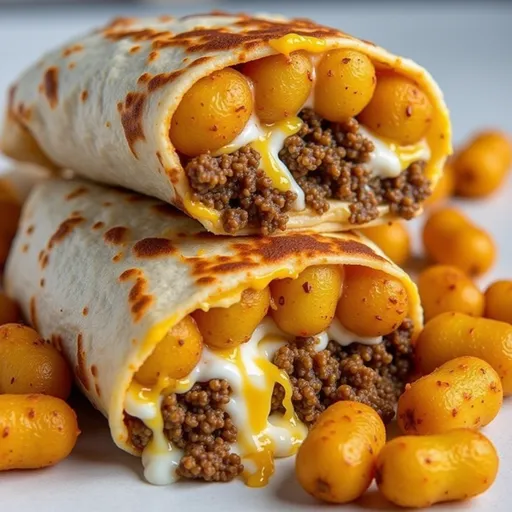
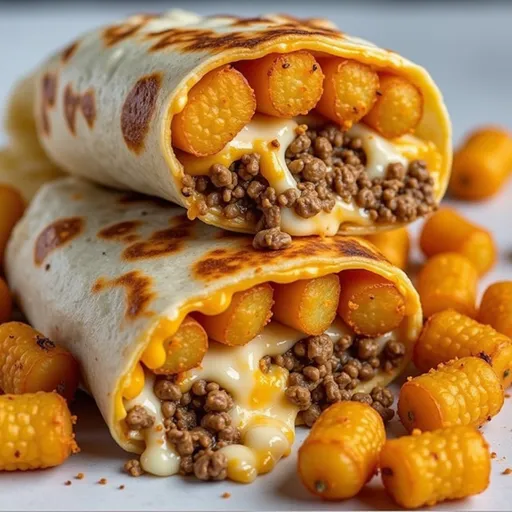
Comfort food comes in many forms, but when you combine crispy tater tots with gooey cheese and warm tortillas, you’ve truly hit the jackpot. These Cheesy Potato Burritos with Crispy Tater Tots are more than just a meal; they’re a hug for your taste buds! Whether you’re cooking for a family dinner or craving something cozy for yourself, this dish promises satisfaction with every bite.
Imagine sinking your teeth into a warm burrito, where crispy tater tots mingle with rich mashed potatoes and melting cheddar cheese, all wrapped snugly in a soft tortilla. The best part? It’s incredibly easy to whip up, making it a perfect choice for busy weeknights or a fun weekend treat. Ready to dive into this deliciousness? Let’s get started!
Ingredients You’ll Need
To create these delightful burritos, gather the following ingredients:
- 4 large flour tortillas
- 2 cups frozen tater tots
- 2 cups shredded cheddar cheese
- 1 cup sour cream
- 1 cup cooked and mashed potatoes
- 1 teaspoon garlic powder
- 1 teaspoon onion powder
- Salt and pepper to taste
- Chopped green onions for garnish (optional)
How to Make Cheesy Potato Burritos
Now that you have your ingredients ready, it’s time to bring this recipe to life. Follow these simple steps to create a delicious dish that will become a family favorite.
Step 1: Preheat Your Oven
Begin by preheating your oven to the temperature specified on the tater tots package. This step is crucial for achieving that crispy texture we all love!
Step 2: Bake the Tater Tots
Spread the frozen tater tots on a baking sheet in a single layer. Bake according to the package instructions, usually until golden and crispy. This typically takes about 20 to 25 minutes, depending on your oven. Once they are done, set them aside to cool slightly.
Step 3: Prepare the Mashed Potato Mixture
While the tater tots are baking, grab a mixing bowl and combine the cooked and mashed potatoes with garlic powder, onion powder, salt, and pepper. Mixing these ingredients well will create a flavorful base that complements the crispy tots perfectly.
Step 4: Warm the Tortillas
Next, warm your flour tortillas in a skillet or microwave until they are pliable. This step is essential for rolling them without cracking. If using a skillet, heat it over medium heat and warm each tortilla for about 10-15 seconds on each side.
Step 5: Assemble the Burritos
Now comes the fun part! Take a tortilla and spread a generous portion of the mashed potato mixture in the center. Top this with a good handful of shredded cheddar cheese. Once the tater tots are cool enough to handle, add a few of those crispy gems on top.
To roll the burritos, fold in the sides of the tortilla and then roll it tightly from the bottom up. Make sure to keep everything snug inside!
Step 6: Bake for Extra Cheesy Goodness
Place the rolled burritos seam-side down in a baking dish. For that extra layer of deliciousness, sprinkle more shredded cheese on top. Pop them in the oven for about 10 minutes or until the cheese is bubbling and slightly browned. This step is where the magic happens!
Step 7: Garnish and Serve
Once out of the oven, let your burritos cool for a minute. If you like, garnish them with chopped green onions for a fresh pop of color and flavor. Serve with a side of sour cream for dipping, and enjoy!
How to Serve Cheesy Potato Burritos
These burritos are delightful on their own, but pairing them with the right sides can elevate your meal even further. Here are some suggestions:
Garnishes
- Chopped fresh cilantro
- Diced tomatoes
- Sliced jalapeños for those who like a kick
Side Dishes
- Crispy tortilla chips with salsa
- A simple side salad with a zesty vinaigrette
- Mexican rice or refried beans for a more filling meal
Creative Ways to Present
For a fun twist, consider slicing the burritos into bite-sized pieces and serving them as appetizers at your next gathering. Pair them with various dipping sauces to keep things exciting!
Make Ahead and Storage
Planning ahead? These burritos are perfect for meal prep! Here’s how to store and reheat them:
Storing Leftovers
Leftover burritos can be stored in an airtight container in the refrigerator for up to 3 days. This keeps them fresh and ready for a quick, satisfying meal.
Freezing
If you want to keep these burritos longer, wrap each one tightly in foil or plastic wrap and place them in a freezer bag. Frozen burritos maintain their quality for up to 2 months, making them perfect for meal prep or a last-minute dinner.
Reheating
To reheat refrigerated or thawed burritos, use the oven at 350°F until heated through and the cheese is melted again. You can also use a microwave for convenience, but the oven will keep that crispy burrito exterior intact.
FAQs
Can I substitute the ground beef?
Absolutely! This recipe is versatile. You can use ground turkey, chicken, or even plant-based meat alternatives. Each option will work wonderfully!
What if I don’t have chipotle sauce?
No worries! You can replace it with any smoky hot sauce or simply skip it for a milder flavor. A drizzle of BBQ sauce can also add a nice twist!
Are there vegetarian versions of this recipe?
Definitely! Just swap the meat for seasoned beans or extra veggies to keep the burrito hearty and satisfying.
Can I make this gluten-free?
Yes, you can easily adapt this recipe by using gluten-free tortillas. Enjoy the same delicious flavors without gluten!
How spicy is this dish?
The spiciness depends on how much chipotle sauce you choose to use. If you’re sensitive to heat, start with less and add more to taste.
Tips for Success
- Don’t overstuff: While it’s tempting to pile on the filling, be careful not to overstuff the tortillas. This will make rolling them difficult and can lead to spills while baking.
- Experiment with cheeses: Feel free to mix up the cheeses! Monterey Jack, pepper jack, or a Mexican blend can all add different flavors.
- Get creative: Think of adding sweet corn, black beans, or diced bell peppers to the filling for extra nutrition and flavor.
Final Thoughts
These Cheesy Potato Burritos with Crispy Tater Tots are not just a meal; they’re a celebration of comfort food at its finest. With their crispy exterior and cheesy, savory filling, you’ll find yourself making these again and again. Whether you’re feeding a crowd or enjoying a cozy night in, this dish is sure to bring smiles to the table. So roll up your sleeves, gather your loved ones, and let’s make some magic in the kitchen together!
Cheesy Potato Burritos with Crispy Tater Tots
Ingredients
Tortillas
- 4 pieces large flour tortillas
- 2 cups frozen tater tots
- 2 cups shredded cheddar cheese
- 1 cup sour cream
- 1 cup cooked and mashed potatoes
- 1 teaspoon garlic powder
- 1 teaspoon onion powder
- to taste salt and pepper
- chopped green onions for garnish (optional) green onions (for garnish)
Instructions
- Bake the frozen tater tots according to package instructions until crispy.
- Mix mashed potatoes with garlic powder, onion powder, salt, and pepper.
- Warm tortillas and spread mashed potato mixture on each.
- Add shredded cheese and crispy tater tots, then roll into burritos.
- Serve with sour cream and garnish with green onions if desired.
Notes
Nutrition
Loved this recipe? Save it to your favorite Pinterest board so you can easily find it later! It’s the perfect way to keep all your sweet ideas in one place. ✨