Welcome to the World of Sugar Cookie Icing!
Hey there, sweet friends! Today, we’re diving into the delightful realm of sugar cookie icing. Whether you’re a seasoned baker or just starting your culinary adventure, this easy-to-follow icing recipe is your gateway to transforming plain cookies into stunning edible art. Join me as we whip up some magic in the kitchen!
Why You’ll Love This Recipe
This sugar cookie icing recipe is not just about taste; it’s about creating memories and joy. Here are five reasons why you’ll fall in love with it:
- Simple and Quick: This recipe is super easy to make, requiring just a few ingredients and minimal time. You can whip it up in under 15 minutes!
- Customizable Colors: Want to match your icing to a theme? Add food coloring to create vibrant hues, making your cookies perfect for any occasion.
- Perfect Consistency: The icing dries to a smooth finish, ideal for both flooding and outlining your sugar cookies. No more lumpy icing!
- Versatile Use: Beyond sugar cookies, this icing works wonderfully for cupcakes, cakes, and even as a fun dip for fruits.
- Great for All Skill Levels: Whether you’re a beginner or a baking pro, this recipe is forgiving and fun, encouraging creativity in every batch.
Ingredients You’ll Need
Here’s what you’ll need to get started:
- 3 cups powdered sugar: The base of our icing, providing sweetness and structure.
- 4 tablespoons milk: This adds creaminess and helps achieve the right consistency.
- 1 1/2 tablespoons light corn syrup: This ingredient ensures your icing dries with a beautiful, glossy finish.
- 1/2 teaspoon vanilla extract: For flavor! Feel free to swap this for peppermint or orange extract for a fun twist.
- Dash of salt: Just a pinch to balance the sweetness.
- Optional food coloring: Divide your icing into bowls and add food coloring to create a rainbow of colors!
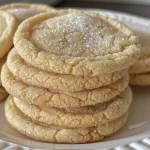
- Plain cooled sugar cookies: The canvas for your artistic creations!
Step-by-Step Instructions

Let’s get to the fun part! Follow these simple steps to make your decorative sugar cookie icing:
- In a medium-sized bowl, whisk together the powdered sugar, milk, corn syrup, and your chosen extract until smooth.
- If you want to create multiple colors, divide the icing into separate bowls and add food coloring as desired.
- Transfer the icing into a piping bag fitted with your choice of piping tip.
- Now for the fun part—decorate your cookies! If you’re adding sprinkles, do it before the icing starts to set.
- Let the icing dry completely for about 3 hours. Then, enjoy your beautiful creations!
Pro Tips for Success
Before you start your icing adventure, here are some expert insights to ensure your icing turns out perfectly every time:
- Cooling is Key: Make sure your cookies are completely cooled before icing. Warm cookies can cause the icing to melt.
- Consistency Matters: If your icing is too thick, add a bit more milk. If it’s too thin, add more powdered sugar.
- Layer It Up: For a more complex design, let the first layer of icing dry before adding additional colors or layers.
- Experiment with Techniques: Try different piping techniques like outlining, flooding, and brush embroidery for unique designs.
- Storage Tips: Keep any leftover icing in an airtight container. You can re-whip it to restore its texture!
- Practice Makes Perfect: Don’t worry if your first batch doesn’t look perfect. Just have fun with it! Every cookie is a new canvas.
- Use a Toothpick: For small details or to fix any mistakes, a toothpick can help you adjust the icing.
- Keep It Fun: Cooking is all about joy and creativity. Invite friends or family to join in on the decorating fun!
Common Mistakes and Troubleshooting
Even the best bakers make mistakes! Here’s how to fix common icing issues:
- Cracking Icing: If your icing cracks as it dries, it may be too thick. Try adding a little more milk.
- Too Runny: If your icing is too runny to hold its shape, add more powdered sugar gradually until you reach the desired consistency.
- Color Bleeding: If your colors run into each other, ensure the first layer of icing is completely dry before adding more.
- Sticky Icing: If your icing remains sticky after a few hours, it could be a sign of too much humidity in the air. Consider using a fan to help it dry faster.
Variations to Try
Feeling adventurous? Here are some fun variations to switch things up:
- Chocolate Icing: Substitute half of the powdered sugar with cocoa powder for a rich chocolate flavor.
- Spiced Icing: Add a pinch of cinnamon or nutmeg for a warm, spiced twist that’s perfect for the holidays.
- Citrus Icing: Use lemon or orange juice in place of milk for a zesty flavor that pairs beautifully with sugar cookies.
- Flavored Icing: Experiment with different extracts like almond or coconut for unique flavor profiles.
Storage and Make-Ahead Instructions
Want to get ahead of the game? Here’s how to store your icing and cookies:
- Icing Storage: Store any leftover icing in an airtight container in the fridge for up to a week. Re-whip before using.
- Make-Ahead Cookies: You can make your sugar cookies in advance and freeze them. Just be sure they are completely cooled before freezing!
- Decorated Cookies: Decorated cookies can be stored in a single layer in an airtight container at room temperature for up to a week.
Frequently Asked Questions
Let’s tackle some common questions about sugar cookie icing:
- Can I use this icing for gingerbread cookies? Yes! This icing works wonderfully on gingerbread cookies too.
- How do I achieve a glossy finish? Make sure to include corn syrup and let the icing dry completely.
- Can I pipe intricate designs with this icing? Absolutely! Just ensure it’s at the right consistency.
- What’s the best way to store decorated cookies? Keep them in a cool, dry place, and separate layers with parchment paper.
- Can I use alternative sweeteners? Yes, but the texture and flavor may vary. Experiment and find what works for you!
- How long does the icing take to dry? Typically, it takes about 3 hours to dry completely, but this can vary based on humidity.
- Is this icing safe for kids? Yes! All the ingredients are safe for children, making it a fun family activity.
- Can I add sprinkles? Yes! Add sprinkles while the icing is still wet for the best adhesion.
Nutrition Tips and Dietary Adaptations
If you’re looking to adjust this icing for dietary needs, here are a few tips:
- Reduced Sugar: Consider using a sugar substitute, but keep in mind the texture may differ.
- Dairy-Free Option: Use almond milk or coconut milk in place of regular milk for a dairy-free version.
- Gluten-Free: This icing is naturally gluten-free; just ensure your powdered sugar is certified gluten-free.
Equipment Recommendations
Having the right tools can make all the difference! Here’s what I recommend:
- Piping Bags: Invest in good-quality piping bags for easy decorating.
- Piping Tips: A variety of tips will allow you to create different designs.
- Mixing Bowls: Have a set of medium and small mixing bowls for easy prep and mixing.
- Whisk: A good whisk will help achieve that smooth icing consistency.
Serving Suggestions
Now that your cookies are beautifully iced, let’s talk about serving:
- Perfect for Celebrations: These decorated cookies are fantastic for birthdays, holidays, or any gathering!
- Cookie Platters: Arrange your cookies on a decorative platter for an eye-catching centerpiece.
- Gift Ideas: Package your cookies in cute boxes or bags for thoughtful homemade gifts.
Conclusion: Let’s Get Decorating!
So there you have it, friends! A comprehensive guide to crafting the perfect decorative sugar cookie icing. I hope you’re feeling inspired and ready to get creative in your kitchen. Remember, cooking is about joy, sharing, and most importantly, having fun! Now, grab those cookies, roll up your sleeves, and let’s decorate! Can’t wait to see what you create!

Decorative Sugar Cookie Icing
Ingredients
Powdered Sugar
- 3 cups powdered sugar
Milk
- 4 tablespoons milk
Light Corn Syrup
- 1.5 tablespoons light corn syrup
Vanilla (peppermint, or orange extract)
- 1/2 teaspoon vanilla extract (or peppermint, orange)
Salt
- Dash salt (a pinch)
Food Coloring (Optional)
- Optional food coloring (for multiple colors)
Plain cooled sugar cookies
- As needed sugar cookies (for decorating)
Instructions
- Whisk powdered sugar, 3 tablespoons of milk, corn syrup, and vanilla in a bowl until smooth.
- Divide and color the icing if desired.
- Fill a piping bag with the icing and decorate cookies.
- Add sprinkles before the icing sets, if desired.
- Let the decorated cookies harden for 3 hours before serving.